Showing posts with label Internet. Show all posts

DNN (Dotnetnuke) module development in 10 easy steps

· 0 comments

When I was about to launch my web application, I found myself in front of a daunting task of creating support pages for the website. It is difficult for solo acts like me to think about content for Privacy policy, Terms of Use, Copyright as well as support facilities like forums, feedback, faq and even plain and simple help pages. I’m no web designer too. Dotnetnuke has allowed me to do all these and in less than a day I was able to get it up and running with most of the support pages in place. Having have to worry only about content, in a few more days, the rest of the pages are there too.

Now, what about my pre-existing web pages? I need to convert them to Dotnetnuke modules. Looking around there were very limited resources on the internet on how to go about this. Even forums don’t contain that much information. I’ve downloaded documents for Dotnetnuke Module Development but they were more geared toward re-distributing these modules. Thus too complicated and time consuming for my needs. I might as well create the support pages myself in plain html or .aspx. I just need a quick and simple way to convert my web forms to Dotnetnuke modules.

After a substantial time of tinkering, I was finally able to do it and narrow down DNN Module Development to 10 easy steps. I’m putting it here so that those of you on the same predicament might have use for it and spare yourself the wasted hours trying to figure it out.

To begin,

1. Locate the DesktopModules Folder under you DNN website.
2. Create a under folder it and name it HelloWorld.


3. Right-click the said folder and click Add New Item
4. Select Web User Control and Name it HelloWorldModule.ascx


5. Replace class declaration to inherit from DotNetNuke.Entities.Modules.PortalModuleBase instead of System.Web.UI.UserControl
6. Import the namespaces DotNetNuke and DotNetNuke.Entities.Modules
7. Now let’s do something simple, drag and drop a Label control in the design view of your User Control.
8. On your code behind, create a page load event and add Label1.text = “Hello World!”

You user control’s html should now look like this.


<%@ Control Language="VB" AutoEventWireup="false" CodeFile="HelloWorldModule.ascx.vb" Inherits="DesktopModules_DNNSchool_HelloWorldModule" %>
<asp:Label ID="Label1" runat="server" Text="Label"></asp:Label>


And your code-behind class like this


Imports DotNetNuke
Imports DotNetNuke.Entities.Modules
Partial Class DesktopModules_DNNSchool_HelloWorldModule
Inherits DotNetNuke.Entities.Modules.PortalModuleBase

Protected Sub Page_Load(ByVal sender As Object, ByVal e As System.EventArgs) Handles Me.Load
Label1.Text = "Hello World!"
End Sub
End Class


9. Login to your DNN website and go to Host > Module Definitions. Locate “Import Module Definition” link and click
10. From Control dropdown, locate DesktopModules/HelloWorld/HelloWorldModule.ascx and click Import Control


Your first Dotnetnuke Module is now available in the Module dropdown in the Control Panel. Congratulations!


Go ahead and to a page. You’ll see your new Dotnetnuke module declaring it’s existence to the world.


Just repeat steps 2-7 if you want to create more Modules. Probably step 1 too if your want a “cooler” folder name. Then just code as you would any other Web User Control or a Web form for that matter in Visual Studio.

Search Optimization - Using the right keywords

· 0 comments

Maybe you're too cheap or simply can’t afford an SEO product to help you optimize your site for the right keywords. But if you want to drive traffic to your website, search engine optimization is a must. Using the right keywords is very important. Fortunately, there’s Google to help you with that. And it’s free too.

Simply go to Google’s keyword tool facility for AdWords.


For the keywords, just type in the first few words that comes to you mind about your website or blog. It could be your website’s theme, popular subjects or description. Once you hit the “Get keyword ideas” button, you’ll be presented with a list of related words and the volume of searches per month.


Simply pick from the list and use those words as often as you can on your website’s content, title, keywords (META) and description (META). You must remember though that the more popular the keywords or phrases are, the more websites will compete for them. So choose wisely.


OpenDNS - Filtering your child's web surfing for Free

· 0 comments

My daughter is old enough to know how to use the computer. She would usually just use it for playing web-based games. Initially, we would just place a shortcut on the desktop and she would just click it. If she gets bored with them, she would ask us to look for more games and we would paste the shortcut on the desktop again. It was ok for a while but kids being kids it was later proving to be a bother. So we taught her how to use Google. Now she just searches for the games she wants. Awesome! Convenient.

However, this brings the danger of her accidentally surfing sites which have adult content. Thus began my quest for parental controls and internet filtering solutions. There were a couple of them that I tried but I was looking for something that was free. Something that I myself couldn’t hack if I didn’t know the password.

I finally settled with OpenDNS.

Not only that I have an internet filter, I also have a reliable and fast DNS which is great because both my ISP’s DNS’ often crank up. You don’t even have to use their filters to avail of the DNS service. Having a reliable and secure DNS is good enough.

Now let’s continue with internet filtering….

In summary, the steps that you need to take are

1) Configure your network
2) Register for an OpenDNS account
3) Configure your account to set filters.
4) Tell OpenDNS your IP Address.

In Step 1, OpenDNS pretty much has that covered. I could never write it better myself or give better instructions. There are 3 ways you can configure your network to use OpenDNS – 1. Your computer, 2. Your router and, 3. Your DNS Server (for techies only). I would recommend #2 – configuring your router. OpenDNS has instructions for setting up commonly used or popular routers. If your router is not there, post a comment below and I’ll try to help you figure it out.

Step 2 is a no-brainer. Register for an account here. After registering for an account, you will be sent a confirmation email. Make sure you open your mail first and confirm the account. After that, you will be automatically logged in. If not, go ahead and login with the username and password you used in registration.

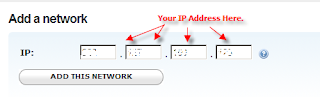
Step 3 tells OpenDNS what to filter for when a request for an internet address is made. First you need to create a ‘Network’. On the top menu, hit the networks tab or go to this address.

You will notice that your IP address is already placed on the form. If it’s not your IP Address or you don’t know you IP address, don’t worry about. Step 4 will take care of that.


Go ahead and click “Add This Network”.

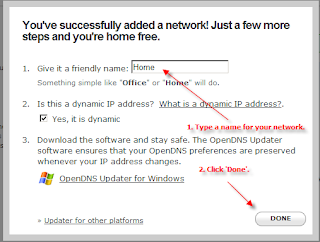
A popup will then appear like the one below.


Type in a name and click ‘Done’. You may now begin setting up filters for your network.

Note: If you entering an IP address that is not on the current network you are using, you will be issued an email again to confirm your network. Make sure you open this email on a computer on the network you are adding and click the link in the confirmation email.

To setup the filters, hit the Settings Tab on the top menu or go to this address.

You will automatically be presented with a quick configuration. For most parents, ‘Moderate’ should probably enough. At least for young parents, you can still have a little but clean fun. The ‘High’ setting is probably more appropriate for office or company networks where you don’t want employees to waste time and bandwidth on social networking sites and others. If you want more control, you can go to ‘Custom’ and tick on the checkboxes.

Step 4 tells OpenDNS that it’s you making the request or that the request is coming from your network. If you have a static IP Address, you can ignore this step altogether. But if you’re like most home users, chances are you have a Dynamic IP address. For this one, you need an Updater.

When I was setting up mine about a year ago, they don’t have an Updater of their own. You have to use third-party updaters and from my experience, it was either too technical or they simply don’t work. I had to summon my programming skills and created my own updater. Recently, they’ve gotten their act together and came up with their own updater -- too bad for me, I would have loved to showcase my own updater :-).

You can download it here.

Once downloaded, launch the file and proceed with the setup. No special steps to perform here. Just click Next until you ‘Finish’. After the installation, you will be presented with a setup wizard. Likewise a no-brainer. Just put in your username and password on the first tab (Updater), hit ‘Refresh’ and you’re good to go!

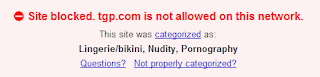
Wait 3-5 minutes and try going to porn sites. Your browser should now be blocked.


Recent Posts

About Me

Alain Rivas
A software / web developer by profession.
A Born-Again Christian by Faith.
A father of two (with one on the way).
A husband of one.
Once a radio disc jockey for eight years.
Now a geek glued to his computer.
View my complete profile