

My daughter is old enough to know how to use the computer. She would usually just use it for playing web-based games. Initially, we would just place a shortcut on the desktop and she would just click it. If she gets bored with them, she would ask us to look for more games and we would paste the shortcut on the desktop again. It was ok for a while but kids being kids it was later proving to be a bother. So we taught her how to use Google. Now she just searches for the games she wants. Awesome! Convenient.
However, this brings the danger of her accidentally surfing sites which have adult content. Thus began my quest for parental controls and internet filtering solutions. There were a couple of them that I tried but I was looking for something that was free. Something that I myself couldn’t hack if I didn’t know the password.
I finally settled with OpenDNS.
Not only that I have an internet filter, I also have a reliable and fast DNS which is great because both my ISP’s DNS’ often crank up. You don’t even have to use their filters to avail of the DNS service. Having a reliable and secure DNS is good enough.
Now let’s continue with internet filtering….
In summary, the steps that you need to take are
1) Configure your network
2) Register for an OpenDNS account
3) Configure your account to set filters.
4) Tell OpenDNS your IP Address.
In Step 1, OpenDNS pretty much has that covered. I could never write it better myself or give better instructions. There are 3 ways you can configure your network to use OpenDNS – 1. Your computer, 2. Your router and, 3. Your DNS Server (for techies only). I would recommend #2 – configuring your router. OpenDNS has instructions for setting up commonly used or popular routers. If your router is not there, post a comment below and I’ll try to help you figure it out.
Step 2 is a no-brainer. Register for an account here. After registering for an account, you will be sent a confirmation email. Make sure you open your mail first and confirm the account. After that, you will be automatically logged in. If not, go ahead and login with the username and password you used in registration.
Step 3 tells OpenDNS what to filter for when a request for an internet address is made. First you need to create a ‘Network’. On the top menu, hit the networks tab or go to this address.
You will notice that your IP address is already placed on the form. If it’s not your IP Address or you don’t know you IP address, don’t worry about. Step 4 will take care of that.
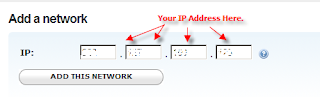
Go ahead and click “Add This Network”.
A popup will then appear like the one below.
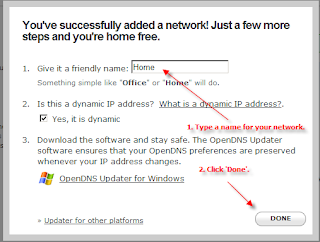
Type in a name and click ‘Done’. You may now begin setting up filters for your network.
Note: If you entering an IP address that is not on the current network you are using, you will be issued an email again to confirm your network. Make sure you open this email on a computer on the network you are adding and click the link in the confirmation email.
To setup the filters, hit the Settings Tab on the top menu or go to this address.
You will automatically be presented with a quick configuration. For most parents, ‘Moderate’ should probably enough. At least for young parents, you can still have a little but clean fun. The ‘High’ setting is probably more appropriate for office or company networks where you don’t want employees to waste time and bandwidth on social networking sites and others. If you want more control, you can go to ‘Custom’ and tick on the checkboxes.
Step 4 tells OpenDNS that it’s you making the request or that the request is coming from your network. If you have a static IP Address, you can ignore this step altogether. But if you’re like most home users, chances are you have a Dynamic IP address. For this one, you need an Updater.
When I was setting up mine about a year ago, they don’t have an Updater of their own. You have to use third-party updaters and from my experience, it was either too technical or they simply don’t work. I had to summon my programming skills and created my own updater. Recently, they’ve gotten their act together and came up with their own updater -- too bad for me, I would have loved to showcase my own updater :-).
You can download it here.
Once downloaded, launch the file and proceed with the setup. No special steps to perform here. Just click Next until you ‘Finish’. After the installation, you will be presented with a setup wizard. Likewise a no-brainer. Just put in your username and password on the first tab (Updater), hit ‘Refresh’ and you’re good to go!
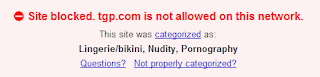
Wait 3-5 minutes and try going to porn sites. Your browser should now be blocked.


0 comments:
Post a Comment