ASP.Net, XSL-FO: nFOP web hosting

· 2 comments

I have been using XSL-FO a lot in my web applications. It allows me to generate dynamic PDF documents for my reporting system or whatever printable output I would like to generate. Something that is not so simple in web applications most especially in ASP.Net.


I could design the document layout or template using XSL (with FO markup of course), output data as XML, do XML transformation, run it on a rendering engine and voila! You have a dynamically generated PDF document.


In ASP.Net, there are available commercial XSL-FO rendering engines. But the one that is free is nFOp.  This is a .Net port from the Apache XML Project's FOP Java source. It is written in J#. And that’s where the trouble lies if you are planning to host your web application through a web hosting accounting.  It requires the Microsoft Visual J#® 2.0 Redistributable Package to be installed on the server and most web hosts do not support J# and would not install redistributable packages either.  I’ve already asked two (Mochahost and WebHost4Life) and gave up the effort of inquiring after getting a no from the both of them.


Not wanting to give up on nFOp altogether, I uninstalled the Redistributable Package on my development PC and ran my application. It would complain of course but everytime it looks for a certain .dll, I would locate it on my other PC and put it on my application’s Bin folder. And success!  It ran after copying just 3 files:


Vjscor.dll

Vjslib.dll

Vjsnativ.dll


You can find these files on the .Net framework folder of the PC where you installed the redistributable package. Usually on C:\Windows\Microsoft.NET\Framework\v2.0.50727.


Now comes the testing if it will work…


In my WebHost4Life account it worked. Great! Now how about Mochahost? Bummer. It didn’t. It won’t allow me to use the DLLs.  I would have loved to make it work there because hosting is cheap and allows me to setup 1000s of websites and SQL Server databases under 1 account.


So right now what I do is, setup my web applications in my Mochahost account and use my WebHost4Life account as my “Print Server”.  A bit more expensive having have to maintain 2 hosting accounts but definitely cheaper that the alternatives.


Update (11 Nov. 2008) - Mochahost had to move me to a different server a few days ago and guess what? Visual J# dependencies now work and I can run nFOP on my websites now.

ASP.Net and SQL Server Globalization - Setting Culture for Date and Time

· 0 comments

This is one of the initial difficulties I found dealing with date and time for websites with cultures set to anything but the default. No problem with US formatted dates.  However, with British formatted dates for example, you have to spend a lot of time formatting your strings within ASP.Net and your SQL server stored procedures. However, there is a way to do this as if you are programming with the default date and time format.  Here’s how…


1.       Connect to your server and expand Security node.


2.       Expand Logins node and locate your user.


3.       Right-click the user and click properties.


4.       Find default language and set to your language.  For example, I work mostly with British format dates (dd/mm/yyyy) so I set it to “British English”.


5.       In your website’s web.config, add the following entry under the <system.web> node.


<globalization culture="en-GB"/>


For other supported cultures go to http://msdn.microsoft.com/en-us/library/system.globalization.cultureinfo.aspx


Now, sql server will always expect your dates to be “en-GB” formatted or whatever culture you have set it to be.  No need to explicitly convert your date strings in ASP.Net or SQL Server.


ASP.Net: Better than Zip - File compression using .Tar.gz Part 1

· 0 comments

Previously I wrote about extracting files from a .Tar.gz archive in Asp.net. This however begs the question, “How do I put my files in a .tar.gz archive in the first place?”


This is a post to answer that question.  In my opinion, the best way to put files in a tar.gz archive is to use the executable files for reasons of performance and the fact that most archiving are done in the backend.  It is also easier implemented especially if automation is involved. But if you think that you must and want only to compress files in ASP.Net then skip ahead to Part 2 of this post.  If you want to try my recommendation then read on.


First, download the Gzip executable here. Just extract and place the file gzip.exe to your windows folder (or any folder on your system path). The objective is to be able to call the program from anywhere.


For the Tar executable you can download this one. Likewise, place it on your windows folder. For simplicity, it’s probably best to rename the file to just “tar.exe”.


You may then compress files from the command prompt like this.


    Tar –czf myarchive.tar.gz *.xml


Where the executable will compress all xml files in the current directory into an archive with filename myarchive.tar.gz


You may also  automate the process using vbscript like this.


    dim WshShell

    Set WshShell = WScript.CreateObject("WScript.Shell")

    dim oZip

    set oZip = WshShell.Exec("tar -czf myarchive.tar.gz *.xml")

    do while oZip.Status = 0

        wscript.Sleep(100)

    loop

    set WshShell = nothing


Don’t forget to read my post on how to extract files from .TAR.GZ files using ASP.Net if you haven’t done so yet. Continue to Part 2

ASP.Net: Better than Zip - File compression using .Tar.gz Part 2

· 0 comments

(Cont’d from Part 1)


Maybe you’re just renting web space or want to compress file using windows forms or simply don’t like anything not done in ASP.Net then here’s how you do it.


Like in my previous posts, import the namespaces….


Imports ICSharpCode.SharpZipLib.Tar

Imports ICSharpCode.SharpZipLib.GZip

Imports System.IO


The paste the following method in your code…


   Sub AddToArchive(ByVal Archive As String, ByVal FolderPath As String, ByVal Files As String)

        Dim gZipStream As New GZipOutputStream(File.Create(Archive))

        Dim TarFile As New TarOutputStream(gZipStream)


        For Each s As String In Directory.GetFiles(FolderPath, Files)

            Dim fiEntry As New FileInfo(s)

            Dim fsEntry As FileStream = File.OpenRead(s)

            Dim b(fsEntry.Length - 1) As Byte

            fsEntry.Read(b, 0, b.Length)


            Dim thEntry As New TarHeader

            thEntry.Name = fiEntry.Name

            thEntry.Size = fiEntry.Length

            thEntry.ModTime = Now

            Dim TarFileEntry As New TarEntry(thEntry)

            TarFile.PutNextEntry(TarFileEntry)

            TarFile.Write(b, 0, b.Length)

            TarFile.CloseEntry()

            b = Nothing

            TarFileEntry = Nothing

            fsEntry.Close()

            fsEntry.Dispose()

        Next

        TarFile.Finish()

        TarFile.Close()

        TarFile.Dispose()

        gZipStream.Close()

        gZipStream.Dispose()

    End Sub


You may then call the method like this…


        Dim sArchive As String = "d:\temp\logs.tar.gz"

        Dim sFolder As String = "D:\logs"

        Dim sFiles As String = "*.log"

        AddToArchive(sArchive, sFolder, sFiles)


Where  d:\temp\logs.tar.gz is the output filename and directory, D:\logs is the folder where the files to be compressed are located and *.log is the search pattern whereby all files with .log extension will be compressed.


Better than Zip - Extracting .TAR.GZ files in ASP.Net

· 0 comments

I once had a requirement to compress 100,000 log files into one archive and be able to extract a single file for processing. Zip is simply not up to the challenge. It can’t take that many files. That would have made my life easier. There are, after all, many resources in the internet on how to do this. After some research I find that .TAR.GZ files (TAR files that were GZipped) seem the best candidate amongst many products.  Mainly because it’s free. They also provide superb compression and frankly I haven’t explored the limits yet of how many files in could pack.


The drawback is the limited documentation on how to handle them in ASP.Net. If you’re willing to spend a couple of bucks then you can indeed have it easy.  It is perhaps more economical to just buy components rather than spend hours working with a free one. But then, if someone tells you how work with the free one then you wouldn’t have to buy would you?


In this post, I’m going to talk about extracting .TAR.GZ files in ASP.Net. However, don’t ask me the details of the code. Like I said, there’s not much documentation around. I came up with this code after hours of trial and error.


The critical component for this sample is SharpZipLib.  Download the dll file here.


After downloading, copy ICSharpCode.SharpZipLib.dll from the net-20 folder and place on your website’s Bin folder.


Import the namespaces System.IO, ICSharpCode.SharpZipLib.Tar and ICSharpCode.SharpZipLib.GZip on your code-behind or class file.


Imports ICSharpCode.SharpZipLib.Tar

Imports ICSharpCode.SharpZipLib.GZip

Imports System.IO


Or like this if you’re using inline code


<%@ Import Namespace="System.IO" %>

<%@ Import Namespace="ICSharpCode.SharpZipLib.Tar" %>

<%@ Import Namespace="ICSharpCode.SharpZipLib.GZip" %>


Then copy the method below


    Sub ExtractFile(ByVal Archive As String, ByVal Filename As String, ByVal DestinationFolder As String)

        Dim gZipStream As New GZipInputStream(File.OpenRead(Archive))

        Dim ZipFile As New TarInputStream(gZipStream)

        Dim ZipFileEntry As TarEntry

        ZipFileEntry = ZipFile.GetNextEntry

        Dim bFound As Boolean = False

        Do While ZipFileEntry IsNot Nothing

            If ZipFileEntry.Name = Filename Then

                bFound = True

                Exit Do

            End If

            ZipFileEntry = ZipFile.GetNextEntry

        Loop

        If bFound = False Then

            ZipFile.Close()

            ZipFile.Dispose()

            gZipStream.Close()

            ZipFile.Dispose()

        End If

        Dim fs As New FileStream(DestinationFolder & Filename, FileMode.Create)

        ZipFile.CopyEntryContents(fs)

        ZipFile.Close()

        ZipFile.Dispose()

        fs.Close()

        fs.Dispose()

    End Sub


The method above is designed for general use. It will extract one file and save it to disk.  For example….


        Dim sFilename As String = "pic1.jpg"

        Dim sArchive As String = "D:\temp\pics.tar.gz"

        Dim sDestinationFolder As String = "D:\"

        ExtractFile(sArchive, sFilename, sDestinationFolder)


This will extract the file “pic1.jpg” from the archive “D:\temp\pics.tar.gz” and save it under the folder “D:\”. From there you may do a couple of things like redirect to the file or do some processing.  That depends on your requirement. It’s perfect for archiving pictures, old content, or whatever you see fit to save space.  You will have to maintain an index of that somewhere of course.

Don't miss this post on file compression using .Tar.Gz in ASP.Net


An ASP.Net developer's Assesment on Chrome's 1st week

· 0 comments

Everyone’s all the rave for the release of Google’s Chrome. At least, in IT circles it is. But here’s my 2 cents for what it’s worth.

1. It’s fast.

I have a 1.4Mb page (in html) with a variety of javascript, textboxes, dropdown controls and many others.
IE – 8 secs
Firefox – 4 secs.
Chrome – 1sec.

However, users of Asp.net websites will most likely see this error a lot.

Validation of viewstate MAC failed. If this application is hosted by a Web Farm or cluster, ensure that <machineKey> configuration specifies the same validationKey and validation algorithm. AutoGenerate cannot be used in a cluster.

It’s rendering the visual elements so fast, users will most likely cause a postback (click a button or link) before the ViewState controls are rendered on the page.

2. Stable. I have yet to see it crash.

3. Aesthetically pleasing.

You would think this is a Microsoft product because of its office 2007 blue theme. There’s also a couple of themes out there. Just google for “Chrome Themes”.

4. Not so many plug-ins yet. Probably a bad thing for Bloggers and Social Bookmarkers.

5. Resource Hog?

At least my friend thinks so when he’s watching something on YouTube. I tested it with this video and it seems to work fine.

Chrome – 12 % CPU, 20MB memory
IE – 1-2% CPU with occasional burst to 45%. 50MB memory
Firefox – 12-15%. 50MB memory

It’s even performing better than firefox. However, try to doing an "inspect element" (right click on any page) and the inspector would use so much CPU.

6. Fonts are horrible.

At least, Firefox fonts are awful too. But if you’ve got ClearType. This solves the problem with both Firefox and Chrome.

7. AJAX does not work 100%.

I can’t make this code work but it does with Firefox and IE. I guess it’s attempting to use an ActiveX control?


function GetXmlHttp()
{
var oXmlHttp=false;

// -----> This method was provided from Jim Ley's website
/*@cc_on @*/
/*@if (@_jscript_version >= 5)
// JScript gives us Conditional compilation, we can cope with old IE versions.
// and security blocked creation of the objects.
try {
oXmlHttp = new ActiveXObject("Msxml2.XMLHTTP");
} catch (e) {
try {
oXmlHttp = new ActiveXObject("Microsoft.XMLHTTP");
} catch (E) {
oXmlHttp = false;
}
}
/*@end @*/


if (!oXmlHttp && typeof XMLHttpRequest!='undefined')
{
oXmlHttp = new XMLHttpRequest();
}

return oXmlHttp;
}


XMLHttpRequest() Object works on this page

AJAX Control Toolkit seems to work as well as other AJAX extensions controls.

If it manages to capture a large chunk of the market, this would force developers to recode. At this point, they have to make us happy. Others are also reporting problems with AJAX on Chrome

8. Not an IE killer. This study says so. And I would agree.

These are crude tests of course. Hopefully, somebody more qualified with more resources can do a more scientific one. At this point, Chrome is the browser I would use for fun but not for work. But then, how many percent of people out there uses the browser for work? I bet they’re the 1.15% that downloaded Chrome this week. So overall, it’s showing a lot of promise. (Sniff) I shall have to recode soon…


DNN (Dotnetnuke) module development in 10 easy steps

· 0 comments

When I was about to launch my web application, I found myself in front of a daunting task of creating support pages for the website. It is difficult for solo acts like me to think about content for Privacy policy, Terms of Use, Copyright as well as support facilities like forums, feedback, faq and even plain and simple help pages. I’m no web designer too. Dotnetnuke has allowed me to do all these and in less than a day I was able to get it up and running with most of the support pages in place. Having have to worry only about content, in a few more days, the rest of the pages are there too.

Now, what about my pre-existing web pages? I need to convert them to Dotnetnuke modules. Looking around there were very limited resources on the internet on how to go about this. Even forums don’t contain that much information. I’ve downloaded documents for Dotnetnuke Module Development but they were more geared toward re-distributing these modules. Thus too complicated and time consuming for my needs. I might as well create the support pages myself in plain html or .aspx. I just need a quick and simple way to convert my web forms to Dotnetnuke modules.

After a substantial time of tinkering, I was finally able to do it and narrow down DNN Module Development to 10 easy steps. I’m putting it here so that those of you on the same predicament might have use for it and spare yourself the wasted hours trying to figure it out.

To begin,

1. Locate the DesktopModules Folder under you DNN website.
2. Create a under folder it and name it HelloWorld.


3. Right-click the said folder and click Add New Item
4. Select Web User Control and Name it HelloWorldModule.ascx


5. Replace class declaration to inherit from DotNetNuke.Entities.Modules.PortalModuleBase instead of System.Web.UI.UserControl
6. Import the namespaces DotNetNuke and DotNetNuke.Entities.Modules
7. Now let’s do something simple, drag and drop a Label control in the design view of your User Control.
8. On your code behind, create a page load event and add Label1.text = “Hello World!”

You user control’s html should now look like this.


<%@ Control Language="VB" AutoEventWireup="false" CodeFile="HelloWorldModule.ascx.vb" Inherits="DesktopModules_DNNSchool_HelloWorldModule" %>
<asp:Label ID="Label1" runat="server" Text="Label"></asp:Label>


And your code-behind class like this


Imports DotNetNuke
Imports DotNetNuke.Entities.Modules
Partial Class DesktopModules_DNNSchool_HelloWorldModule
Inherits DotNetNuke.Entities.Modules.PortalModuleBase

Protected Sub Page_Load(ByVal sender As Object, ByVal e As System.EventArgs) Handles Me.Load
Label1.Text = "Hello World!"
End Sub
End Class


9. Login to your DNN website and go to Host > Module Definitions. Locate “Import Module Definition” link and click
10. From Control dropdown, locate DesktopModules/HelloWorld/HelloWorldModule.ascx and click Import Control


Your first Dotnetnuke Module is now available in the Module dropdown in the Control Panel. Congratulations!


Go ahead and to a page. You’ll see your new Dotnetnuke module declaring it’s existence to the world.


Just repeat steps 2-7 if you want to create more Modules. Probably step 1 too if your want a “cooler” folder name. Then just code as you would any other Web User Control or a Web form for that matter in Visual Studio.

Find IP Address Location By Country in ASP.Net

· 0 comments

Being able to tell on-the-fly which country your visitors come from is a big boon. The applications are numerous. You can use it to extend your security by limiting to certain countries only. Or perhaps you want present a different page or ad per country. Or you just want to automatically select the country in the dropdown of your forms.

Fortunately, thanks to MaxMind, this is all free and easy. Here are 5 simple steps:


1. Download API files and extract
2. Copy CountryLookup.vb to you App_Code folder or Class Library
3. Download Database and extract
4. Copy GeoIP.dat and place it on your website.
5. Start using it.

Dim _UserIPAddress As String = Me.Page.Request.UserHostAddress
Dim _IPDataPath As String = Me.Page.Server.MapPath("data/GeoIP.dat") 'relative path to the Geo IP Database.
Dim _CountryLookup As CountryLookup = New CountryLookup(_IPDataPath)
Dim _CountryName As String = _CountryLookup.LookupCountryName(_UserIPAddress)
Response.Write(_CountryName)


C# API is also available here as well as other programming languages. APIs also come with country flag images which you can use to create cool user interfaces.


Free counter and web analytics in real-time

· 0 comments

Google analytics is awesome. However, a 24-hour wait time is just too long for someone who has just started a website. Its reports are also very broad and probably more appropriate for big websites with thousands of hits a day. I needed to do my tracking in real time so that I could get information about my visitors immediately. Where they are coming from, what pages they are viewing and what’s stopping the website from getting conversions. That way I could make corrections in an instant.

So I did a quick search on Google for “real time website tracking”. On the first page, I only found one that’s free and immediately available. And that is StatCounter. Others were either on free trial or available only through paid subscription or on beta or by invitation only. * I realized while writing this blog entry that I should have typed “free real time website tracking” instead but then...I already found what I want.

I’ve been using it the past couple of days and I find really helpful. My website is a free web based personal finance software. So conversion for me means registrations and signups. Knowing what pages my visitors are viewing tells me what their specific needs and requirements are. The pages they exit from gives me a clue what I needed to add or remove. In summary here’s how I find StatCounter:

The good:

1. Immediately available, free and not a trial offering.
2. Tracks visitors in real time
3. Detailed information of each individual visits – where they come from, who referred them, what they are viewing, which pages they exited.
4. Has blocking cookies to ignore your own visits.

The bad:

1. Up to 500 detailed logs per website only.
Old logs get overwritten when this is used up. If you want more you need to pay. However, who wants to keep track of each of those 500 recent visits? As for me, I only need the last few.

2. Reports are not as good and numerous as Google Analytics.

My recommendations:

Use both Statcounter and Google Analytics. I would liken it to a war (pardon the comparison). Soldiers on the field need immediate feedback and information of the ongoing battle. While generals on HQ need to know how the war is progressing. These two, for those who are looking for a free service, is an amazing combination.


Search Optimization - Using the right keywords

· 0 comments

Maybe you're too cheap or simply can’t afford an SEO product to help you optimize your site for the right keywords. But if you want to drive traffic to your website, search engine optimization is a must. Using the right keywords is very important. Fortunately, there’s Google to help you with that. And it’s free too.

Simply go to Google’s keyword tool facility for AdWords.


For the keywords, just type in the first few words that comes to you mind about your website or blog. It could be your website’s theme, popular subjects or description. Once you hit the “Get keyword ideas” button, you’ll be presented with a list of related words and the volume of searches per month.


Simply pick from the list and use those words as often as you can on your website’s content, title, keywords (META) and description (META). You must remember though that the more popular the keywords or phrases are, the more websites will compete for them. So choose wisely.


OpenDNS - Filtering your child's web surfing for Free

· 0 comments

My daughter is old enough to know how to use the computer. She would usually just use it for playing web-based games. Initially, we would just place a shortcut on the desktop and she would just click it. If she gets bored with them, she would ask us to look for more games and we would paste the shortcut on the desktop again. It was ok for a while but kids being kids it was later proving to be a bother. So we taught her how to use Google. Now she just searches for the games she wants. Awesome! Convenient.

However, this brings the danger of her accidentally surfing sites which have adult content. Thus began my quest for parental controls and internet filtering solutions. There were a couple of them that I tried but I was looking for something that was free. Something that I myself couldn’t hack if I didn’t know the password.

I finally settled with OpenDNS.

Not only that I have an internet filter, I also have a reliable and fast DNS which is great because both my ISP’s DNS’ often crank up. You don’t even have to use their filters to avail of the DNS service. Having a reliable and secure DNS is good enough.

Now let’s continue with internet filtering….

In summary, the steps that you need to take are

1) Configure your network
2) Register for an OpenDNS account
3) Configure your account to set filters.
4) Tell OpenDNS your IP Address.

In Step 1, OpenDNS pretty much has that covered. I could never write it better myself or give better instructions. There are 3 ways you can configure your network to use OpenDNS – 1. Your computer, 2. Your router and, 3. Your DNS Server (for techies only). I would recommend #2 – configuring your router. OpenDNS has instructions for setting up commonly used or popular routers. If your router is not there, post a comment below and I’ll try to help you figure it out.

Step 2 is a no-brainer. Register for an account here. After registering for an account, you will be sent a confirmation email. Make sure you open your mail first and confirm the account. After that, you will be automatically logged in. If not, go ahead and login with the username and password you used in registration.

Step 3 tells OpenDNS what to filter for when a request for an internet address is made. First you need to create a ‘Network’. On the top menu, hit the networks tab or go to this address.

You will notice that your IP address is already placed on the form. If it’s not your IP Address or you don’t know you IP address, don’t worry about. Step 4 will take care of that.


Go ahead and click “Add This Network”.

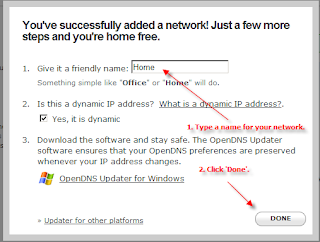
A popup will then appear like the one below.


Type in a name and click ‘Done’. You may now begin setting up filters for your network.

Note: If you entering an IP address that is not on the current network you are using, you will be issued an email again to confirm your network. Make sure you open this email on a computer on the network you are adding and click the link in the confirmation email.

To setup the filters, hit the Settings Tab on the top menu or go to this address.

You will automatically be presented with a quick configuration. For most parents, ‘Moderate’ should probably enough. At least for young parents, you can still have a little but clean fun. The ‘High’ setting is probably more appropriate for office or company networks where you don’t want employees to waste time and bandwidth on social networking sites and others. If you want more control, you can go to ‘Custom’ and tick on the checkboxes.

Step 4 tells OpenDNS that it’s you making the request or that the request is coming from your network. If you have a static IP Address, you can ignore this step altogether. But if you’re like most home users, chances are you have a Dynamic IP address. For this one, you need an Updater.

When I was setting up mine about a year ago, they don’t have an Updater of their own. You have to use third-party updaters and from my experience, it was either too technical or they simply don’t work. I had to summon my programming skills and created my own updater. Recently, they’ve gotten their act together and came up with their own updater -- too bad for me, I would have loved to showcase my own updater :-).

You can download it here.

Once downloaded, launch the file and proceed with the setup. No special steps to perform here. Just click Next until you ‘Finish’. After the installation, you will be presented with a setup wizard. Likewise a no-brainer. Just put in your username and password on the first tab (Updater), hit ‘Refresh’ and you’re good to go!

Wait 3-5 minutes and try going to porn sites. Your browser should now be blocked.


IAM Flash Shield - Active Protection Against Removable Drive Viruses

· 0 comments

Recently, I released a cleanup program for viruses that spread itself through USB Flash Drives. At the moment, it only has 2 signatures – the 2 variants of the Aikelyu virus. I would add more when I get my hands on more specimens.

I am a bit surprised how widespread these infections are. I would attribute that to the increasing popularity USB Flash Drives and how easily new variants and imitations can be created. Anti-virus companies will definitely have a hard time catching up. As a matter of fact, some popular anti-viruses still can’t detect some of them. Or maybe, they just choose to ignore them. These viruses after all are more of an annoyance rather than a threat to data integrity.

I am a firm believer of the saying “Prevention is better than cure.” Rather than having the most comprehensive cleaner for every single flash drive virus out there, it’s better not get yourself infected at all. The preventive steps to manually detect and delete these viruses are simple. However, over time they can be drag.

And so, I spent the weekend building a simple utility to detect viruses lurking in your usb flash drive. It’s usually just there waiting to be activated when you use autoplay or by double clicking the drive’s shortcut in My Computer. It is an indiscriminate scan. Whenever autorun.inf points to a script or executable, it will prompt you if you recognize the script or the program. If you don’t recognize it, clicking yes would delete it. If it doesn’t find any it will prompt you that it didn’t so you can safely start using your removable drive.

There’s only a few hours of work built into this utility so don’t expect amazing stuff. But it does the job. Scans are done on program startup and every time you insert a removable drive in the computer. During first run, it will also lodge itself on the startup programs list so that it gets activated every time you log in to our computer.

In the future, I will add more functionality by integrating IAM Flash Clean. Maybe an auto updater. Or maybe you can make suggestions in the comments below. Hopefully, I have enough free time to do all that.

I called it IAM Flash Shield. You may download this active resident protection against removable usb flash drive viruses here.


IAM Flash Shield

· 0 comments

Note: This software is offered to you FREE, "AS IS" and without any warranties. Use at your own risk.

IAM Flash Shield 1.01

Features:

- Scans Removable / USB Flash Drives for hidden programs / scripts in autorun.inf
- Prompts for user action when a possible virus is found.
- Automatically detects newly inserted removable / usb flash drives.
- Automatically scans removable /usb flash drives when this program starts.
- Prompts user if removable / usb flash drive is safe to use.
- Starts automatically on Windows logon (This software adds itself to Startup Programs).

Requirements:

This software is written using the .Net Framework 2.0. Download and install before using this software.


Instructions:

1. Download the software by click the link above.
(Don't use a download manager. Files are small anyway.)
2. Unzip to any folder.
3. Double click IAMFlashShield.exe. An icon will appear on your task bar to show that it is running.


Flash Drive Viruses (Aikelyu / deadly-c.vbs / pooh.vbs)

· 0 comments

Flash drive based viruses have been on the rise recently. Most are harmless but no less annoying. I do get exposed to a lot personal computers as my job requires me to do onsite maintenance of my programs. I get exposed to them a lot and even got infected once.

Sadly, most of these seem to have been written by fellow Filipinos (or at least some variants) and most occurrences seem to be localized here in the Philippines. This probably explains why these escape the eyes of some large anti-virus companies.

The most recent one I’ve encountered is Deadly-c.vbs. It seems like a variant of the Aikelyu virus. Looking around the internet, it also occurs as pooh.vbs. It propagates itself in all writable drives except the floppy disk and during windows startup it calls Internet explorer and shows an html file containing the irritable words “f%%k you-->this is jayker felling----->PogitosGwaposAmigosGarantisadosGalantis Kaayos!!”.

This time I finally decided to deal with it. I’m a VB programmer myself and this one being written in vbscript I can read and look at what it does. So it’s fairly easy to come up with a cleanup program. I named it IAMFlashClean and I’m hoping make it clean other viruses of the same kind as I encounter them.

You can download the IAMFlashClean Aikelyu virus cleaner here should anyone would want to use it.


IAM Flash Clean

· 0 comments

Note: This software is offered FREE, "AS IS" and without any warranties. Use at your own risk.

IAMFlashClean 1.00

Virus Signatures:
- Aikelyu (Deadly-c.vbs)
- Aikelyu (pooh.vbs)

Requirements:

This software is written using the .Net Framework 2.0. Download and install before using this software.


Instructions:
1. Download the software by click the link above.
(Don't use a download manager. Files are small anyway.)
2. Unzip to any folder.
3. Double click IAMFlashClean.exe to begin cleaning.
4. A reboot may be required after cleaning.


If you want active protection against flash drive viruses, trojans and worms consider using IAM Flash Shield.

My Contribution to the OFW's (Overseas Filipino Workers)

· 0 comments

If you’re like any other Filipino living in the Philippines, chances are you know somebody or related to somebody working abroad. In my case, I have a sister in Chicago working as a nurse. My brother too is hoping to leave the country and work as a nurse.

My aunts were among the first batches of nurses out of the Philippines that migrated to the US. Hence, I have 3 siblings who are nurses (one eventually became a nun so no overseas work for her). Nurse cousins? Oh, I have lost count.

For most Filipinos, it means a better life for themselves (the OFW’s) and primarily, the loved ones they have here at home. Is it not all about the money? I would like to think not. But it is a means to an end.

Now that brings us to the website that I developed. IAM Personal Finance. Proudly made in the Philippines. It’s a free to use personal finance website that helps you keep track of your expenses as well as income.

One of my visions for this website and for OFW's in particular is for them and their beneficiaries at home to have a common account and manage their finances together. Money after all is hard to come by and that’s mainly the reason why OFW’s are leaving the country and their families. So it’s only natural that we should be frugal in our finances and know where every penny is going. The more we save, the sooner we can go back home and maybe just start a business or live on the savings.

It has also features for monitoring income. So if you already have a business at home, you can use this website to monitor how well your business is doing and if indeed it is making money. This is not a business application but it has adequate tools to give you a general view of your business in terms of income and expense.

My personal favorite is the checkbook management feature.

There are many products like this out there. But most are tied to actual bank accounts (mostly US banks). This one you can use to even monitor the money in your wallet. Or the piggy bank (or the kawayan bank). Because it's not tied to actual bank accounts, it's safe and not a target for hackers.

More features are being added and you get to participate in it. Just post your suggestions on the forums.

Take a look and register today. It's FREE. Mabuhay and God bless you all.